A dedicated gaming space goes beyond plugging in a console and calling it done. The best gamer bedrooms balance performance, comfort, and personality, turning a simple room into an immersive environment where long sessions feel effortless rather than exhausting. Whether you’re a competitive esports player, a casual console gamer, or someone who splits time between work and play at the same desk, thoughtful setup choices pay dividends in focus, posture, and enjoyment. This guide walks through practical gamer bedroom ideas that prioritize function alongside aesthetics, helping you build a space that actually works for extended gaming sessions.
Table of Contents
ToggleKey Takeaways
- Invest in a quality gaming chair with lumbar support and an ergonomic desk (24+ inches deep) positioned at eye level to prevent posture problems during extended sessions.
- Implement layered lighting with warm ambient light (3000K–4000K), bias lighting behind your monitor, and a desk lamp to reduce eye strain faster than any equipment upgrade.
- Organize cables from the start by labeling, routing power separately from data cables, and using cable sleeves and trays to maintain a functional, troubleshoot-friendly gamer bedroom setup.
- Choose wall decor strategically with a few large framed pieces or a dark feature wall, then enhance with mounted shelves and display cases to reflect your gaming personality without cluttering the space.
- Store controllers, consoles, and accessories using modular shelving units and wall-mounted racks to keep your workspace clear while keeping gear within arm’s reach.
Optimize Your Gaming Desk and Seating
Your desk and chair form the foundation of any gaming setup. A quality gaming chair provides lumbar support and adjustability that a standard office chair often lacks, look for models with tilt-lock, adjustable armrests, and a seat height range that keeps your feet flat on the floor with knees at 90 degrees.
For the desk itself, aim for a surface depth of at least 24 inches to accommodate both a monitor and peripherals without crowding. Standard heights run 28 to 30 inches, though some gamers prefer desks at 27 inches for better arm positioning during long sessions. Cable routing holes and built-in cable trays prevent the tangled mess that accumulates under a gaming desk in weeks.
Solid wood or engineered wood tops handle weight better than particle board if you’re mounting a monitor arm or adding multiple screens. If you’re building a standing desk option, ensure the mechanism raises and lowers smoothly, hydraulic or dual-motor systems are quieter and more stable than cheaper screw-based lifts. A monitor arm frees up desk real estate and lets you position your screen at eye level, reducing neck strain during marathon sessions. Position the top of your monitor about 2 to 3 inches above eye level when seated, roughly arm’s length away (20 to 26 inches).
Budget $200–500 for a solid gaming chair depending on materials and features, and $150–400 for a reliable desk. Don’t skimp on this foundation, poor posture habits formed over months are hard to break.
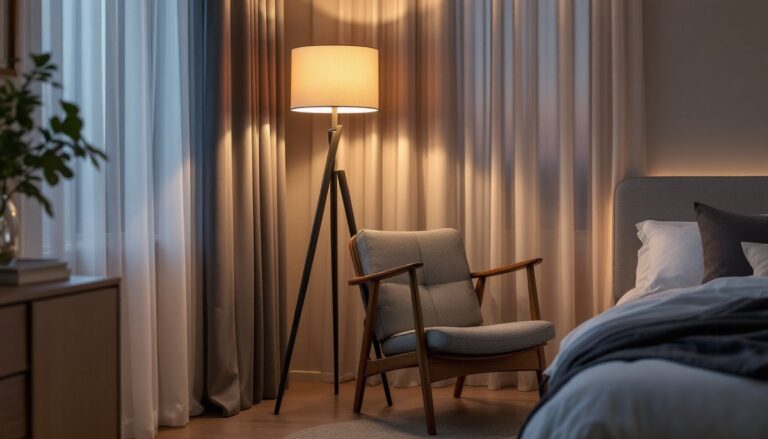
Lighting Design for Extended Gaming Sessions
Poor lighting causes eye strain faster than almost anything else in a gaming room. The goal is indirect, even illumination that doesn’t create glare on your screen or harsh shadows across your desk.
Start with ambient lighting: ceiling fixtures or track lighting that covers the whole room without being blindingly bright. Aim for 3000K to 4000K color temperature (warm white to neutral white), this range is easier on the eyes than cool blue light during long sessions. Avoid 5000K+ (daylight) bulbs directly overhead, as they mimic screen brightness and increase fatigue.
Add task lighting behind your monitor with bias lighting, LED strips mounted on the back of your monitor diffuse light onto the wall, reducing the contrast between the bright screen and dark room. This simple addition cuts eye strain noticeably. RGB bias lighting is trendy but eventually unnecessary: a simple warm-white LED strip does the job and costs $20–40.
Drop a desk lamp on the opposite side of your keyboard from your mouse hand to light your work surface without creating glare on the screen. A dimmable lamp gives flexibility for different times of day. If you game late into the evening, consider installing a smart dimmer or using bulbs that shift from warm to cooler tones gradually, helping preserve your natural sleep rhythm.
Total lighting investment: $100–250 for ambient, bias, and task lights combined. This beats any monitor or chair upgrade for reducing physical strain.
Cable Management and Tech Organization
Cable clutter isn’t just ugly, it makes troubleshooting, repositioning, and cleaning nearly impossible. Tackle this early, before you have twenty cables jammed under your desk.
Start at the source: label every cable at both ends with a small adhesive tag or wrap. Use a label maker if you’ll be adding or swapping gear frequently. Route power cables separately from data cables (USB, HDMI, ethernet) to reduce electrical noise interference, though in a bedroom this is less critical than in a professional studio.
Use cable sleeves or split tubing to bundle multiple cables together, braided nylon sleeves look cleaner than generic plastic and withstand repeated movement. For a permanent setup, cable trays mounted under the desk keep everything off the floor and easy to access. Velcro straps (not rubber bands, which degrade cables over time) secure bundled cables without pinching them.
Keep a short power strip directly on or under the desk within arm’s reach so you can kill gaming power without crawling behind furniture. Mount it with adhesive clips or zip ties to the desk frame, and route the main cord to the wall outlet along the desk leg.
Consider a patch panel or breakout box if you’re rotating multiple devices, USB hubs with individual switches let you power down inactive gear without unplugging. This reduces clutter and saves power. Budget 20–30 minutes per 10 cables for initial setup, then maintain it as you add gear. A tidy cable run pays for itself in peace of mind and salvage time when something stops working.
Wall Decor and Gaming Aesthetics
Walls set the mood and fill dead space, but cluttering them shrinks a room psychologically. Choose decor that reflects your gaming interests without making the space feel like a dorm room wall.
Posters and prints work well but keep them intentional, two or three large pieces beat a dozen small ones. Frame them properly with matte finishes that reduce glare from your monitor or overhead lights. Gaming artwork from artists like Apartment Therapy often showcases budget-friendly options and community design inspiration that balances aesthetics with practicality.
If you want more personality, consider a feature wall. A dark matte paint (charcoal, midnight blue, or deep gray) absorbs light better than white and reduces glare, creating a calmer environment for long gaming sessions. Pair it with accent lighting (adjustable RGB strips or track lights) to create depth without overwhelming the space.
Wall-mounted shelves above your desk provide display space without taking up floor room. Mount shelves at least 12 inches above desk height to keep your sightline clear and avoid hitting your head when adjusting your chair. Use picture rails or floating shelves rather than drill-heavy installations if you’re renting, they come down clean and don’t require patching.
Avoid anything that vibrates or rattles when equipment runs (fans, speakers). Wall vibration is annoying and distracting during tense moments.
Display Cases and Collectibles
If you collect gaming hardware, figures, or memorabilia, display cases protect items from dust while keeping them visible. Glass-door units look more polished than open shelves and maintain a curated feel. Mount them at eye level or slightly above so you’re not staring at empty lower shelves.
Keep collectible lighting consistent and cool (4000K–5000K) so items don’t fade unevenly. Avoid direct sunlight through windows, which yellows plastic and fades prints over time. Interior LED strip lights in cases add visual interest and take up minimal power. Rotate displays seasonally to refresh the space without major effort.
Storage Solutions for Games and Accessories
Game libraries, whether physical or digital, and accessories accumulate faster than floor space allows. Smart storage keeps everything within reach while maintaining a clean sight line from your desk.
For physical media (consoles, controllers, game cases), open shelving or modular cube units work well. An IKEA Kallax or similar cubby system slots into corners and holds games, controllers, extra cables, and headset stands. The modular approach means you can expand as your collection grows. If you prefer a gaming cabinet aesthetic, you can make a retro gaming with some woodworking skills, though this requires painting, wiring, and assembly time.
Wall-mounted controller holders keep gear accessible without consuming desk space. Controllers on a desk collect dust and invite accidents when your arm swings: a wall rack near your chair is more practical. Charging docks for controllers and headsets eliminate tangled charging cables.
Use drawer organizers or small bins inside shelves to corral cables, batteries, and small peripherals. Label each bin clearly so you’re not digging through tangles hunting for a specific USB-C charger. Desk drawer dividers keep your immediate workspace uncluttered.
If you’re storing older consoles or backup gear, use clear plastic storage boxes in a closet rather than under the bed, dust and temperature swings damage electronics, and under-bed storage traps heat and humidity.
Sound System and Audio Setup
Audio matters more than most gamers realize. Built-in monitor speakers are typically tinny and directional: even modest external speakers or headphones improve immersion and communication during multiplayer sessions.
For headphones, over-ear designs with memory foam padding stay comfortable during 4–6 hour stretches, true comfort matters more than flashy RGB lights. Wired headphones eliminate wireless latency concerns and never need charging. If you prefer wireless, check the latency spec (look for 1ms or lower) and battery life (aim for 20+ hours). A dedicated headphone stand keeps cables from tangling and makes the headset visible rather than stuffed in a drawer.
If you prefer speakers, a stereo pair of powered monitors (20–40 watts per channel) positioned at ear level on stands flanking your monitor delivers clear sound without dominating the room. Avoid placing speakers on the desk itself, where vibration transfers to your mouse and keyboard. Position them about 3–4 feet apart, aimed toward your head, roughly 1–2 feet above ear level. This creates an even stereo field without harsh reflections off nearby walls.
Acoustic treatment (bass traps, absorption panels) helps if you’re in a room with hard walls and floors, sound bounces and creates muddiness. Soft furnishings like curtains, rugs, and wall hangings absorb some reflections naturally. You don’t need professional treatment for casual gaming, but awareness of room acoustics prevents audio surprises.
Microphone choice depends on your use: USB condenser mics ($50–150) work well for streaming or recording gameplay, while lavalier or headset mics built into headphones are fine for casual voice chat. Budget $150–400 for a solid audio setup (headphones or small speakers plus a microphone if needed).