An entryway niche does more than fill empty wall space, it sets the tone for your entire home. Whether you’re working with a deep alcove or building a recessed shelf into drywall, a well-designed wall niche becomes a focal point that welcomes guests and tells a story about how you live. In 2026, entryway niche design leans toward functional elegance: clean lines, intentional styling, and materials that work as hard as they look. This guide walks you through modern ideas, installation basics, and styling tips to transform that bare wall into something worth noticing.
Table of Contents
ToggleKey Takeaways
- Entryway wall niche ideas range from floating shelves and geometric frames to arched designs and functional storage, all designed to create a focal point that welcomes guests and reflects your personal style.
- Proper installation requires locating studs, using heavy-duty brackets, and maintaining level alignment—cutting corners on fasteners or skipping stud mounting risks structural failure and defeats the design investment.
- Accent lighting transforms a niche from purely decorative to architectural by using LED strips or recessed fixtures that highlight displayed objects while maintaining a warm, welcoming ambiance.
- Modern niche styling embraces either curated minimalism with statement pieces or organic layering with plants and textures, with negative space and a cohesive color palette being key to intentional-looking designs.
- DIY niche projects cost significantly less than hiring contractors while delivering the same polished results—budget smartly on materials and fasteners, invest in quality paint and primer, and prioritize structural integrity over false economy.
Modern Floating Shelf Niches
Floating shelves are the quickest way to create a niche without cutting into studs or drywall. A 1-inch thick hardwood shelf (actual dimensions matter here, nominal 1×12 lumber is really 3/4 inch thick) mounted on heavy-duty floating brackets can hold 25–50 pounds depending on wall construction and bracket quality.
Start by locating studs with a stud finder, this is non-negotiable for anything you want to trust. Mark your stud locations with a pencil. If your desired shelf location doesn’t align with studs, use toggle bolts or heavy-duty drywall anchors, but understand that drywall-only mounting tops out around 15–20 pounds safely. For an entryway shelf holding decorative objects, this is usually fine, but don’t load it like a bookcase.
Measure twice, drill once. Drill pilot holes slightly smaller than your bracket screws to prevent wood splitting. Use a level, even 1/8 inch of slope ruins the look and causes objects to shift. Secure brackets into studs with 3-inch construction screws for maximum hold.
The beauty of floating shelves is their flexibility. You can install a single 24–36 inch shelf, stack two shelves vertically 12–16 inches apart, or create an asymmetrical cluster. The material choice matters: live-edge wood brings warmth, while painted MDF (medium-density fiberboard) offers clean modernism and costs less. Paint-grade MDF works fine for shelves: it’s stable, doesn’t warp, and takes primer and paint beautifully.
For a truly custom look, consider a 3/4-inch thick poplar or pine shelf with a solid wood edge banding on the front. This hides the laminations and looks hand-built. Sand the front edge smooth and finish with stain or paint, this detail separates a thoughtful niche from a basic shelf.
Minimalist Display Niches With Geometric Frames
Geometric frames, square, rectangular, and hexagonal, create visual structure and define the niche without overwhelming the space. These frames can be open (no backing) or backed with plywood painted to complement your wall color.
To build a simple square niche frame, use 1×4 or 1×6 pine lumber (nominal dimensions: actual widths are 3.5 or 5.5 inches). Cut your pieces to length with a miter saw for clean corners. A 45-degree miter joint on all four corners looks polished and professional, though a simpler butt joint works if you’re painting it solid. Use wood glue and 1.25-inch brad nails to assemble: pre-drill to prevent splitting.
After assembly, sand with 120-grit sandpaper, then prime and paint. A matte finish in soft white, warm gray, or a accent color like sage green reads modern without trying too hard. Avoid glossy finishes in entryways, they show fingerprints and dust constantly.
For the backing, cut a piece of 1/2-inch plywood to fit inside the frame. Paint it the same as the frame or contrast it with a muted tone. The backing serves two purposes: it anchors the frame to the wall and creates a recessed platform for displaying objects.
Install the frame by securing it into studs with 2.5-inch construction screws driven through the frame sides into the wall studs. If studs don’t align, use heavy-duty drywall anchors, but prioritize stud mounting. The frame itself becomes a design statement, so every line must be straight and every corner tight. Use a combination square and level to check both horizontal and vertical alignment before driving final fasteners.
This approach works equally well for a single large frame or a series of smaller frames clustered together. The repetition of geometric shapes creates rhythm and feels intentional, especially when styled with intentional negative space.
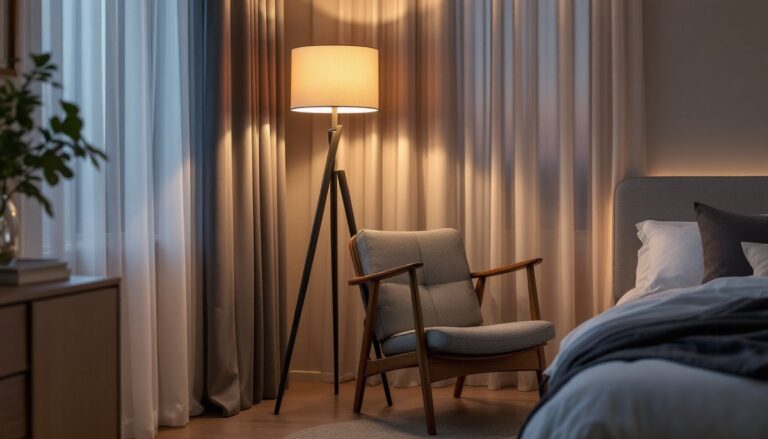
Accent Lighting and Arched Niche Designs
Lighting transforms a niche from decorative afterthought to architectural feature. An LED strip light mounted along the top inside edge of a niche creates ambient glow and highlights whatever sits on the shelf below. LED strips are inexpensive, run cool (no heat damage to décor), and connect to plug-in or hardwired power supplies.
For a hardwired approach, consider running a low-voltage LED track light or recessed fixture above the niche. This requires running wire through the wall cavity to a nearby junction box, doable for a confident DIYer but worth a licensed electrician if you’re unsure about code compliance. Your local electrical code (NEC standards) governs wire gauge, junction box placement, and switch requirements. When in doubt, hire it out: electrical mistakes aren’t cosmetic.
Arched niches bring softness to an entryway and feel far more intentional than straight-edged rectangles. Building an arch requires a bending jig and flexible material. The most practical approach: use flexible drywall (1/4-inch standard drywall is rigid: 1/4-inch flexible drywall bends smoothly). Screw it to a curved frame made from 1-inch flexible PVC or bending plywood secured with studs at the niche opening.
The radius of your arch depends on the niche opening width. A gentle arch (8–12 inch rise over a 24-inch opening) is forgiving and elegant. Steeper arches (more than 12 inches) are dramatic but demand precise framing to avoid uneven gaps.
Combine an arched niche top with recessed or surface-mounted lighting aimed downward, and you’ve created a gallery-quality focal point. The light should be soft and warm (2700K color temperature reads residential and welcoming, while 4000K or cooler feels commercial).
For a budget alternative, paint the niche backing in a warm accent color, terracotta, warm white, or soft gold, and let natural entryway light play across it. Paint does the work for free.
Functional Niche Storage Solutions
Not every niche is purely decorative. If your entryway is tight on storage, a recessed niche can hold cubbies, small shelves, or pull-out baskets.
Woven natural fiber baskets (seagrass, rattan) fit a 12–18 inch wide cubby and hold shoes, gloves, or mail without looking cluttered. Build cubbies from 3/4-inch plywood divided into two or three compartments by vertical dividers. Screw the dividers into the top and bottom of the niche frame. Finish with stain or paint, and add a simple 1/4-inch plywood backing painted the same color for a seamless look.
For keys and small items, pegboard inserts work well in a smaller niche. Use 1/4-inch pegboard and add simple wooden pegs or metal hooks. Pegboard is affordable, functional, and reads intentional if left natural or painted a soft color.
Shallow niches (4–6 inches deep) are perfect for floating shelves that hold small decorative boxes containing mail, keys, or seasonal items. Mount two or three narrow shelves and add labels if organizing appeals to you.
If your niche goes deeper than 12 inches, consider pull-out baskets on soft-close drawer slides. These slides mount to the niche sides and allow baskets to glide smoothly. They’re sturdier than static baskets and make accessing rear items easy. Soft-close slides cost $15–30 per pair and are worth every cent for smoothness.
Keep storage niches minimal: don’t fill every inch. One or two cubbies with breathing room look cleaner and more functional than a packed shrine. A tidy entryway niche makes guests feel welcome: a chaotic one sends the opposite message.
Decorative Niche Styling With Plants and Artwork
Once the structure is built, styling makes the niche yours. Modern entryway niches typically embrace one of two approaches: curated minimalism (fewer, bolder objects) or organic layering (plants and textures with intentional arrangement).
For a minimalist look, choose one or two statement pieces: a framed print, a sculptural object, or a single potted plant. Negative space is the style here, think gallery rather than collection. A 16×20 inch framed print or a 6-8 inch ceramic vessel standing alone on a shelf feels intentional and expensive without cost.
Plants bring life. A small pothos or philodendron in a 4-6 inch pot thrives in most entryway light conditions and trails beautifully if mounted on a higher shelf. A snake plant or ZZ plant tolerates low light and sits upright as a sculptural form. Skip anything that demands humidity or special care, entryways are transition zones, not plant spa environments. Choose planters that complement your wall color: warm terracotta against cream walls, matte ceramic in tones matching your trim, or simple terracotta against painted color.
Layering works when you commit to a color palette. Say you choose warm whites and soft greens. Combine a low ceramic planter with trailing ivy, a framed botanical print, and a small wooden box or brass vessel on the same shelf. Objects at varied heights (stack books under a pot to elevate it) create depth. Experiment on the shelf before securing anything.
Artwork matters. A niche is the perfect spot for a small series of framed prints (three 8×10 inch frames in a vertical line, or four 6×6 prints in a grid). Painting this area light and hanging art in that space elevates the whole entryway. Modern home decor inspiration resources like Decoist showcase examples of niche styling that feel fresh without overthinking.
Mix textures: matte wood, glazed ceramic, painted canvas, and natural fiber. This prevents the niche from looking sterile. One plant, one art piece, one decorative object per shelf is a safe starting point. Add and subtract until it feels right, there’s no formula.
Budget-Friendly Niche Installation Tips
A DIY-built niche costs far less than hiring a carpenter. Here’s where smart choices save money:
Materials: Recessed niches cut into drywall between studs (typically 16 inches on center) can be built from basic 1×4 framing lumber ($2–4 per stud), drywall scraps (often free from suppliers), joint compound, and sandpaper. Total framing cost: $20–40. If you’re building a surface-mounted frame niche, use paint-grade pine or MDF, both cost $15–30 for a shelf-sized piece.
Labor: Doing this yourself is the budget win. A contractor charges $500–1500 to build and finish a niche: DIY labor costs only time.
Fasteners: Buy in bulk. A box of 2.5-inch construction screws (100 count) costs $8–12 and handles multiple projects. Brad nails for trim run $4–6 per box. Wood glue ($5) lasts for years.
Paint and Finish: One quart of quality paint covers about 100 square feet, a niche uses only a fraction. Buy small quarts in the exact color you want rather than gallons you’ll never finish. Primer matters: use a true primer (not primer-in-one paint) for raw wood, especially if you’re painting over stain or dark colors.
Tools: If you don’t own a stud finder ($15–30), one is invaluable for any wall project. A level ($10–20 for a 2-foot model) is essential. A drill and circular saw or miter saw are assumed for DIYers: if you need to buy them, costs jump, but these tools pay for themselves across projects. Most local tool rental shops offer daily rates ($20–40) if buying isn’t in your budget.
Avoid false economy: Cheap brackets fail: save $20 by not using a stud and risking a shelf collapse. Cheap paint needs extra coats: spend the extra $5 on quality. Cheap drywall anchors strip easily: invest in Toggler or similar commercial-grade anchors ($0.50 each) for anything load-bearing.
Interior design trends evolve, and resources like House Beautiful showcase updated approaches. A well-built niche looks fresh in any era because solid construction and clean finishing never go out of style. Start small, a single floating shelf, and build confidence before tackling framed or arched work.
Conclusion
An entryway niche transforms overlooked wall space into a designed feature that greets you and guests every time you enter. Whether you choose minimalist floating shelves, geometric frames, arched designs with lighting, or functional storage, the core principles remain: level installation, careful finishing, and thoughtful styling. Start with your wall’s condition, measure precisely, and don’t rush fastening. Style comes after structure settles. In a few hours of focused work, you’ll have a niche that feels intentional, built-to-last, and genuinely yours.